Archive for the ‘ Android ’ Category

Install Custom ROM on Your Sony Xperia Phone

Disclaimer: Modifying your phone can lead to an expensive paper weight if you do it wrong. Do it at your own risk.

How to Install Custom ROM on your Sony Xperia Phone

If you root your Android phone, you can do virtually anything, right from enabling career-blocked tethering to installing a custom ROM. The android community is so active that chances are that you can get tens of custom ROMs for your phone model. If you have a Sony Xperia Mini Pro, you can have hundreds of custom ROMs from the XDA forums. These custom ROMs provide you with more performance, flexibility, and more.

In this tutorial, I am going to show you how to flash custom ROM on your Xperia Mini Pro. You can use the same method for any Xperia phone. Before installing a custom ROM, you need to unlock the bootloader of your phone, though there are a few custom ROMs that can be installed on a locked bootloader. But unlocking the bootloader is well worth it, meaning you can install custom Kernel that provide you with more benefits such as more battery life or overclocking.

Unlocking the bootloader

You have two options while unlocking the bootloader. The official method which includes using your IMEI to unlock from official Sony website. Though this is the official method, you lose your warranty, and DRM too.

The other method is called the ‘test point’ method which uses a tool called S1 tool and requires you to use a test point. Though this method seems a little complicated, it’s easy and reversible. By unlocking with this method, you won’t lose DRM and whenever you want, you can relock the bootloader. But even this method has a disadvantage. Not a disadvantage but a risk-you may make your phone into an expensive paper weight, if you do it wrong. But don’t worry, it’s safe if you do it carefully. I have unlocked the bootloader of my XMP with this method and it worked like charm. Follow the instructions from here or here to unlock the bootloader with the test point method.

***Ensure that your phone is charged at least 50% before proceeding***

What You Need:

1. Sony PC Companion

2. Flashtool

3. Preferably a phone with unlocked bootloader

4. Your custom Kernel and ROM

5. Stock ROM in FTF format. Search the XDA forums for your model number. You can also create one.

How to install:

Installing the custom Kernel and ROM is very easy. Follow these steps.

1. Make a backup of your phone data such as SMS, contacts, call logs, calendar, and so on using your favorite app.

2. Install PC Companion and Flashtool so that ADB and Fastboot drivers are installed. On your phone, go to Applications>Development>check the USB bebugging check box. Connect your phone to PC and let it install the ADB driver. This is important because, should something go wrong, you can always flash your phone stock ROM (FTF file) using Flash tool. So before proceeding, ensure the adb (and fastboot) drivers are installed. For more details, check out my previous postĀ Root Your Xperia Phone Without Voiding Warranty.

3. Place the downloaded ROM in zip format on the micro SD card. You can do it through phone or usingĀ  a card reader.

4. Turn off your phone and connect it to your PC while pressing the specific button on phone to enter the fastboot mode. For my Xperia Mini Pro, it’s the Vol + to enter fastboot mode. Wait till the driver is correctly installed.

5. Open Flashtool and click the Flash (thunder symbol)>Fastboot Mode>OK.

fastboot1

6. On the Fastboot Toolbox window, click Select kernel to Flash button.

fastboot2

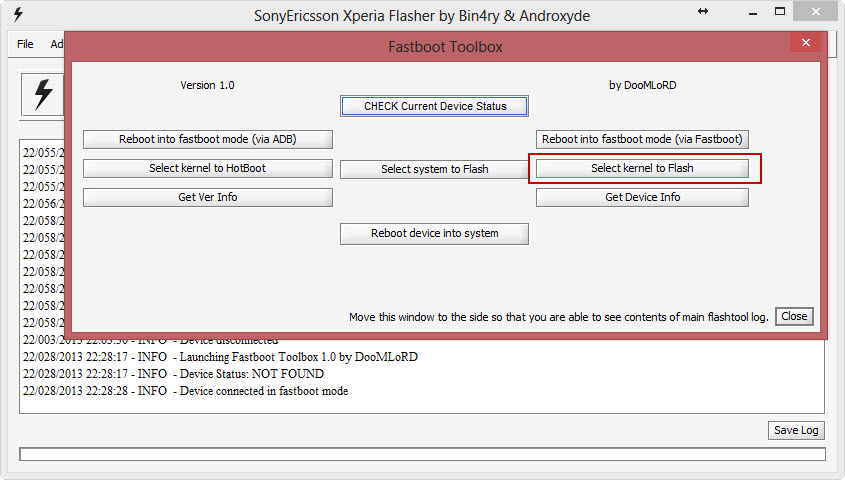
7. Navigate to the folder where you have extracted the Kernel file (.img). Select it and click Open.

fastboot3

8. After flashing is complete, remove the cable and reboot your phone. While the phone is booting, press Vol – or Vol + button repeatedly until the phone boots into recovery. (This recovery is installed along with kernel)

9. Do these: wipe data.cache partition, advanced>Wipe Dalvik Cache, and wipe cache partition.

10. Select install zip from sdcard>choose zip from sdcard>select the ROM file (zip) and press Yes.

That’s all. Reboot your phone to enjoy the new ROM.

What to do if something goes wrong and my phone doesn’t boot up?

While installing custom ROMs can be fun, it may also render your phone unbootable. If you install a custom ROM and and it doesn’t work, you can always flash the stock ROM using Flashtool and start all over again. Look for the FTF file of your stock ROM on the XDA forums. You will certainly find one. You can also make an FTF file of your stock ROM. Check out my post How to Create an FTF file of Your Xperia ICS Firmware.

How to Stream Video from PC to Your Android Phone

Technology has changed everything. Right from the way we access information to the way we are entertained. With mobile devices, we are now doing almost everything that we only used to do with a PC. We are no more using our PCs to watch videos and movies but rather mobile phones and tablets. While we can add more memory to our mobile devices to store more videos, it’s always not the best choice and flash/NAND cannot replace hard disks in the near future. Also, playing movies at higher bit rates is not entirely possible. How about storing all videos and movie rips on your hard disk and play them directly on your mobile?

How to Stream Video from PC to Your Android Phone

In this tutorial, as usual, I’m going to explain how to use a free tool to stream video from your PC/laptop and watch it on your Android powered phone.

What you Need:

Follow these installation steps:

  1. Install Emit Windows application on your PC or laptop.
  2. Install Emit Android app on your phone.
  3. On your PC, click the Emit icon from the System Tray. The Emit window opens.
  4. Click Folders tab and click Add Dir button and select the directory where you have all your videos.

emit windows

That’s all you have to do. Now, tap open the Emit app on your phone and see if the app has automatically discovered the emit server running on your PC. Tap the server and you can go to the directory where you have your movies.

emit-android1

emit-android2

Note: Add Emit to your firewall’s exception list if you have issues connecting.

The Emit windows application is multi-threaded meaning, if you have a multi core CPU, you can be rest assured that the streamed video is lag free, even if the video is 1080p.

How to Root Your Xperia Phone’s ICS Firmware Without Voiding Warranty

Some time back, I wrote an article on how to root your Xperia phone without voiding warranty. That’s a bold statement because you are technically voiding warranty when you do something that Sony don’t want you to. But if you flash back with the latest ROM using PC Companion or SUS, you’ll have a fresh, and unrooted phone. Hence you have done no permanent modification to the phone and for all practical purposes you have the warranty intact. Now, Sony has released an Ice Cream Sandwich update to all its Xperia 2011 phones sans Play. The latest firmware version as of this writing is 4.1.B.0.431 . You cannot root this firmware. But that isn’t going to stop us from rooting it.

How to Root Your Xperia Phone’s ICS Firmware Without Voiding Warranty

If you are not on ICS and wanting root after upgrading, don’t upgrade to ICS. To root your Xperia ICS firmware, you need to first downgrade it to a rootable Ginger Bread firmware like 4.0.2.A.0.58 if you have already upgraded. Anything above 4.0.2.A.0.58 cannot be rooted easily. You can find the firmware from the links given below. So backup all your apps and data like SMS, call logs etc. before proceeding. Once you downgrade, you need to root it (preferably using the Do0omlord’s method). Then you have to edit the /data/local.prop file. Don’t worry, I’ll show you an automated process. Once done you need, to upgrade the firmware to ICS using PC Companion, or SUS or Flashtool (if you have your ICS FTF file) without clearing user data. Then you need to execute a file to root your Xperia Firmware. It may sound too daunting but it’s pretty easy. This tutorial is based on this XDA thread.

What You Need to Root Xperia ICS

If you canā€™t find your firmware:

Downgrading and Rooting

Follow the steps in my article how to downgrade and root Xperia phone. After you have downgraded the firmware and rooted, go to the next step.

Rooting ICS

Download the ICS rooting files and extract all files to somewhere.

Connect your phone to PC with USB debugging enabled and run the file 01-local-prop.cmd from the folder where you extracted the file. This will automatically edit the /data/local.prop file. Don’t do anything else and go to the next step.

edit-local-prop

Now upgrade the firmware using PC Companion, SUS, or Flashtool. Don’t wipe data.

Go to the same folder and run 02-push-root-files.cmd. Re remember to close PCC, SUS or Flashtool before doing this.

s

That’s all. Your phone is now rooted.

How to Create an FTF file of Your Xperia ICS Firmware

Now that all of Xperia 2011 phones (well, except for Play) have had the taste of Ice Cream Sandwich-the latest incarnation of Android. Sony has also confirmed that ICS is only available through PC Companion and not OTA. This means you must connect your phone to PC or Mac to update your firmware. Isn’t it the best time to create an FTF file for the newest ICS firmware?

So what is an FTF file? Without delving deep into it, let me say it stands for Flash Tool File. Using Flashtool, and the correct firmware file, you can easily and conveniently flash your phone anytime you want. With Flashtool, you can install your stock (unmodified) ftf firmware file if you have not unlocked the bootloader. If you unlocked it already, you can flash modified firmware too. Where do you get the .ftf file? You can certainly get your ftf file from XDA Developers forums. But you can also create your own ftf file. Here I’m going to explain how to create an ftf file of your Xperia ICS firmware. Same procedure is applicable for Ginger Bread too.

How to Create an FTF file of Your Xperia ICS Firmware

What you Need to Create an ftf File:

Warning and Disclaimer: Take a backup of all important data like contacts, call logs, SMSs, apps, APN and other settings before proceeding further. You may have to perform a clean install of your OS. While for all practical purposes, using Flashtool is safe but there is a very very remote chance of damaging your phone and don’t blame me should it happen.

1. Install Sony PC Companion and/or SEUS. This will copy the necessary drivers to your PC. Connect your phone with USB Debugging enabled and allow your PC to install the necessary drivers.

2. Connect your phone and update or repair your phone with the latest firmware version (right now 4.1.B.0.431). If you update/upgrade, your data will be preserved. If you repair, all data may be lost. So backup everything. Now, your phone is updated with the latest firmware. Keep it aside. We don’t need your phone anymore to create the ftf file.

3. Go toC:\ProgramData\Sony Ericsson\Update Engine\db\13740270\blob_fs folder and look for the biggest three files. The folder “blob_fs” may be located in a different place depending on whether you used PC Companion or SEUS. Perform a search for that folder if you can’t find it. Once you are inside the folder, sort by size andĀ see the 3 largestĀ files were just created (when you updated/repaired your phone). Copy them to somewhere else like D:\firmware.

blob_fs

4. Install Flashtool and open it.

5. Click Advanced > Decrypt Files.

decrypt

6. Select all the three files and click the right arrow to send them to the right side and click OK. In a moment, you will see a Flashtool pop up window that shows all the decrypted files. Select all and click the right arrow button.

bundle_select_all

7. Type in the device name next to Device, firmware version number next to Version, and branding next to Branding and click OK.

fw_content

8. In the Device Selection window that appears, select your phone model and click OK.

device_selection

In a moment, your ftf file will be there in the default Flashtool folder C:\Flashtool\Firmwares.

new_firmware

You can use this .ftf file to flash your phone using Flashtool.

Why you should create the ftf file?

If you are someone who can’t resist reinstalling/reflashing for whatever reason, creating an ftf file can be a life saver for your phone. If you root and especially unlock the bootloader and install custom ROMs, having the firmware file always with you is a good idea. Should something go wrong, you can simply reflash the phone (remember unbricking?).

How to Sync Files From Your Android Phone to PC Over WiFi

Nowadays, smartphones play an important role in our daily lives. We not only use them for making calls, but also for browsing, listening to music, connecting with others and so on. The more you do on your phone, the more data or filesĀ  (like movies, music, apps, docs etc) it has to store in it. While they give you mobility, amrtphones are also prone to data loss due to different reasons, not to mention the risk of theft. Thus it becomes imperative to take a backup of your important files so that you can retrieve them later if needed. While you can simply connect your phone to PC using the data cable to copy files to PC, why not make things even easier by automating the entire synching process?

How to Sync Files from Android Phone to PC over WiFi

If you have an Android based phone, it almost certainly has WiFi. If you have a wireless router, you can access internet from anywhere at home. If your PC or laptop and your phone are on the same network, that is, same WiFi router, you can automatically sync files from your Android phone to your PC and vice versa.

What You Need to Perform Android Sync to PC:

To automate syncing between PC and an Android phone, follow these steps:

1. Install MyPhoneExplorer Android app on your phone.
2. Install MyPhoneExplorer Windows application.
3. Open MyPhoneExplorer on PC and select File > Settings > Connection > Phone with Google Android-OS.

MyPhoneExplorer Settings

4. Click OK.

5. Under Connect via… select WiFi or Autodetect.

Connect to MyPhoneExplorer

6. Now, your PC will be connected to your phone and MyPhoneExplorer on your phone will say your phone is connected.

MyPhoneExplorer Connected

If your PC doesn’t connect to phone, enable it in your firewall.

Now that you have connected your phone to your PC over WiFi. You need to select folders on your android phone to Sync with your PC. Follow these steps to sync folders on your Android phone to PC:

1. Expand Files on the left pane of MyPhoneExplorer and click Memory Stick.

MPE files folder

2. On the next window, click the arrow mark on Sync Folders icon and click Customize.

MPE customize

3. In the Edit File-Sync Jobs window, Enter a relevant name for the folder you want sync next to Title.

4. Select Phone -> PC. Selecting this will sync a folder in your phone to PC. (You can also do the other way be selecting PC -< Phone.)

5. Select your source (phone) folder and target (PC) folder.

6. Select Save folder radio button.

7. Click OK.

MPE sync jobs

8. Repeat these steps for each folder you want in your mobile to sync to your PC.

9. To sync files, click Sync files button.

MPE sync

If you want to automatically sync files, go to File > Settings > Multi-sync and check Sync Files > Select Jobs. Check the jobs (folders) you want to sync and click OK.

That’s all. You can now sync all these files to PC over WiFi whenever you are at home. MyPhoneExplorer also has more options to sync your calendar, phonebook etc. Just play around with settings to enable more options. I use Llama to automate some of the phone tasks. Whenever I reach home, it triggers MyPhoneExplorer in my phone. When I switch on the PC, it syncs all selected files.